Friday 18 February 2011

Contents

Stage 1: Investigating past ancurrent practice in capture

Stage 2: Planning your capture


Stage 3: Exploring and experimenting


Evaluation

For my capture project I made a website called Manga Sketch, a website dedicated to manga/anime style art and tutorials for it. First I looked at existing websites that provide what I wanted my website to provide. The two main websites I looked at were DevianART and Manga Tutorials, they gave me lots of idea’s oh how to effectively make the kind of website I was making. I them moved on to making a plan in photoshop and then the base’s for the pages. I then started on my mascots, one on paper and one in a program in paint tool sai with the use of my drawing tablet. I then animated these in flash on the enter page. Finally to complete my project I made all the links and scrollbars in flash.

I think the effects on my buttons and my artwork worked best in my website, especially the ones on the enter page. I think that it just made the website less boring and gave my website a better visual look in general. It also helped you get the feel of the website as well as giving the site some individuality.

In future projects I will use all the information I have learned from making this website, especially about buttons and layers and the scroll bar. I will defiantly be using the scroll bar again as I think it’s a really effective tool and helps with keeping the page clutter-free. I also will use my knowledge of layers again as it just makes the whole process easier, especially with the ability to lock layers your working on so you don’t select things you shouldn’t. As for buttons, I think I will defiantly use them again, especially with the different things you can change on ‘up’ ‘over’ ‘down’ and ‘hit’.

My research really helped me work out what looks good and what looks bad on a website, it helped me change some of my plans like how I was going to have music on the site but I know now that most people find this really annoying and that if there isn’t a visible mute sign they may even leave your web page.  My other research wasn’t really that helpful though.

If I had to do this again I would have more images of the mascots and I’d try making the background images for the traditional and digital pages more interesting, for example doodles on the traditional background and more shine and shadows on he digital background to make it look more modern.

All in all I’m proud of my website even if it could do with a bit more work. I have also learnt a lot about how to work flash and photoshop through this project, hopefully the techniques I have learnt will stay with me and make me a better website designer and improve my skills in general. 

Designs for my web page and final website

To make my webpage's I used photoshop and flash for links. For the traditional pages I was going to use this scan of lined paper but it wasn't clean enough so I used it as a template for my final version where the lines were made by the rectangle select tool. I also used the rectangle select tool to make my digital page.


This is an example of one of the finished web pages.


Final website: http://swfcabin.com/open/1300276599

Enter page

I wanted to make a flash enter page for my website from the beginning and I decided I would take a picture of a computer screen with a sketch book in front of it and then put in my mascots. I took the picture with my Camera, a Canon PowerShot A490, in college. The lighting was not good and I had to get rid of the background and some of shine of the screen as well as lower the saturation.
After a while I realised that this wasn't working, it looked out of place and weird so I made a new background in photoshop. I think this looks a lot better as the mascots don't look out of place.

My website plan and logo


This is my plan for my website I'm making. The logo you see here is a rough idea of what I wanted, at first I just wanted to have the symbol of an eye with M and S in it but I then decided this wasn't such a good idea as the name of my company wasn't that well known. Therefore I decided to just use the website name, like how I did when I was still designing for Pandorable. 
This is my final logo design.

Tuesday 8 February 2011

3D experimentation

Today we experimented in 3D with photoshop again. First we made a black to white gradient on the background and used the text tool to type our name. We then went into 3d Repousse and then text layer. We then played around with extrude and lights as well as paning and zooming just like 3D max.
I liked doing this but I still prefer 3D max as its fully focused on 3D and in photoshop 3D is just an extra.

Tuesday 1 February 2011

3D Experimentation


These images were made in photoshop by duplicating the layer so you have two, we then named one red and one blue. We then went into image > adjustments > curves and on the blue layer we went into red and changed the values into 0 and 251. For the red layer we went into green and changed the values to 0 and 251 and then into blue and changed the values to 0 and 251. We then set the layer option for the top layer to screen and move it slightly. This gives the image the illusion of being 3D when wearing retro 3D glasses, this works best on the image of the pig as it was a photo of something 3D to begin with, the piano keys work well as well but there isn't much detail in them.


3D Typography

Today we made this 3D image in photoshop by turning each individual transparent layer into a 3D postcard except the backgroud. We used the files we created with the website wordle for the different layers and we just typed a random word for the focus. After turning the layers into a 3Dpostcard we used the object rotate tool to play around with angles. I then blurred some layers to add a nice effect.

This was fun to make and I really like the effect of the blurred layer over the non blurred one. If I did this again though I'd try and make the focus word stand out more and have it plain as the pattern makes it hard to read.

Tuesday 25 January 2011


Today we learnt about Health and Safety and how to keep healthy when working on computers. We learnt the importance of good posture and having our chairs at the right settings so we don't get back pains ect. We also learnt about the importance of giving out eyes a break by either looking away from the screen every now and then or going on an eye break. 

Wednesday 19 January 2011

Mascot designs

These are my basic designs for my two mascots for my website. The one on the left is my design for my traditional mascot, I tried to incorporate traditional drawing material like paper in the dress, the binder on sketchbooks on the arms, a sharpener hair ornament and socks that look like pencils. I like the design a lot but I dont like the yellow in the socks so I'm going to change that for my final design to a grey. The one on the right is my digital mascot, I tried to make her look futuristic and I also tried to incorporate the on switch from a computer. I like this design a lot as well but I don't really like the hair.

These are my final designs and I will be using these images for my enter page. I changed the socks to tights on the traditional mascot but the rest of her design stayed the same. The digital mascots design changed the most though as I decided to add a green into her colour scheme so that her top looks more like a computer hard drive. 

To make the digital mascot I used a program called paint tool sai and my graphics tablet. For the traditional I drew the sketch in the same program, printed it out then coloured it with pencils.

Time plan


Tuesday 18 January 2011

Capturing with Wordle

Today we used a website called Wordle to capture our selves with words. We then made one for someone else, I made one for AJ. This created an interesting design and I may use it again.

Tuesday 11 January 2011

Change of my website and new proposal

I am changing my whole focus of my website. I have decided to do this because personally I am not interested in the website I would be re-designing and it's hard to incorporate the capture method of drawing into a website about jewellery. Also if the subject of the website is something I personally am strongly interested in then I'll have better ideas for it.


I want to design a website for manga and anime artists with tutorials, contests, anime and game reviews and a place to post people's original manga. I want to make this website because although there a load of websites with similar purposes, some are bad at one thing while good at another and vice versa with other websites, I want to make a website that's good at all these things and user friendlily. I also want to make this website because it's a kind of website I would use.

The main website that inspires me is DeviantART, it has a simple logo and mascot and the layout is neat and easily to navigate, the problem is since it is aimed at all artists there isn't specific focus on the manga/anime style, it's just a sub category. Another website is Manga tutorials, it has a lot of tutorials but they are very poorly presented with only small preview images as well as confusing categories. I really want to use DevioantART's idea of having a mascot but I also want to incorporate the more simplified navigation from Manga Tutorials. To help keep the website easily navigated I'm going to split it in half, one half for traditional art and one half for digital art. I would also like to have an animated front page of the site with a mascot for each half of the website, traditional and digital, that take you to one of the different homepage's depending on what mascot you click on; this will be all animated in flash.

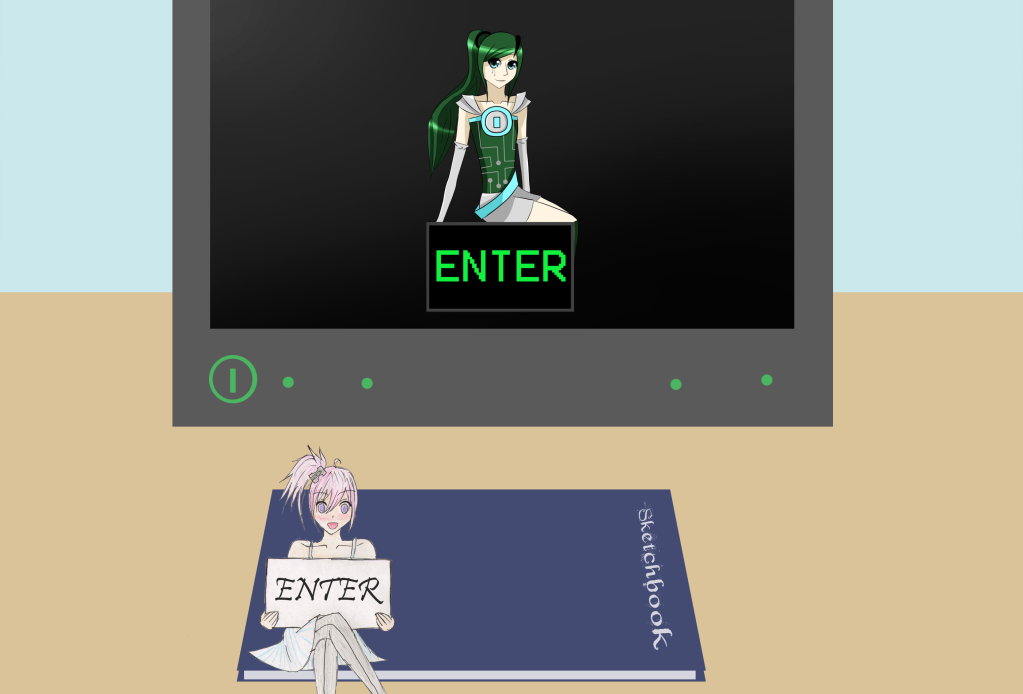
While researching both DeviantART and Manga tutorials I realised that most of the site is made up of images, which makes sense. Therefore I will be using traditional drawing, scanning and tablet drawing a lot, both in vector and bitmap. My mascots will be bitmaps made in photoshop and an art program called paint tool sai, my logo will be a vector and so will any animations. I've also decided to make a font for the traditional part of my website by getting my friend to write the alphabet in pencil and then I will scan it into the computer, as for the digital side of my website I will use an existing font called OCR A Std. For the front page I will use my digital camera to take a picture of a computer screen with a sketchbook in front of it so I can edit it in photoshop to add the websites two mascots, the digital mascot on the screen and the traditional mascot on the sketchbook. Because this is the only photo I am taking there’s no need for any special lighting or effects to be used. I may also record videos for some of the tutorials and use an internet sound bank for button clicks.

The main problems with the existing sites it is too hard to find exactly what you want. With my website the first page you get to choose if you want traditional or digital art by clicking either on the digital mascot in the computer screen or the traditional mascot on the sketchbook. This will either take you to the traditional or digital homepage which will have links to Tutorials (basic, line-art, colouring, background, specific programs/pens), Contests (Joint or just traditional/digital), Art (shojou, shouen, chibi, all) and Anime/manga reviews (this links to the same page whether you get to it via traditional or digital.)

Sunday 9 January 2011

Cover page and double spread in Neville Brody's style

In the holidays we were asked to make a cover page and double spread page in the style of Neville Brody. His work has a good mixture of a bit of photography and strong bold fonts in different colours. For the cover I found a nice stock image of a woman throwing flowers in the air and I decided to have her throwing words up in the air too. I decided to use this rounded font I have for a soft kind of look and I inverted the colours and changed the hue to pink for the word love. I then realised that the photo was too detailed and took away from the text so I filtered it and lowered the saturation.
For the double spread I tried to do something more in the traditional Brody style. I used a bold font and a bit of colour as well as rotated/flipped and different sized letters.

I didn't really like doing this but I really like my double page spread. If I had to do this again I would try and keep the design simple unlike my cover which was over crowded.