Today we tried to re-create this image of a ball in photoshop using all stuff we have learnt over the last 5 weeks, I made my ball by making a selection with the elliptical marquee tool while holding down shift to make an exact circle. I then filled it with colour and added an inner glow layer option, I then decided this didn't work and instead I reselected the circle by clicking on the thumbnail of the layer while holding crtl and filled it with white. I then rubbed out the middle with a big soft rubber, leaving slightly more white at the top of the ball. I then did the same thing with black but only left a bit at the bottom. Then on a new layer I made an oval with the pen tool and filled it with a gradient, white to transparent. After that I added 4 highlights on the top left of the ball with a large soft brush at low opacity. For the shadow I simple filled a oval with black and blurred it. Finally I added the white circle and burned the bottom right corner a bit before add in a 7.
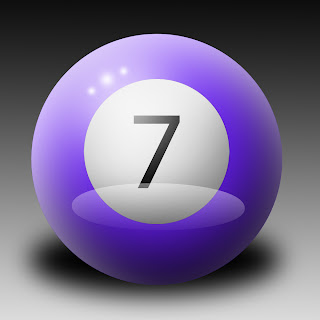
In Marz's way we started the same but for the shadow we used the same selection we used for the ball and filled it with black before blurring it and fiddling around with the perspective. We then used the burn and dodge tools for the big highlight and shadows and for the white edge we used a layer mask instead of just rubbing it out. The rest was pretty much the same as how I did it. Although the shadow looks far better.
This has taught me how to use different methods to get to the same result and taught me a few different techniques.


No comments:
Post a Comment